前言#
在「2024 年了,我的博客有了什么变化」一文中,我介绍了自己使用 Serverless 平台和一些开源项目搭建的博客系统,也开启了这个系列教程来记录搭建和部署全过程。
本篇是关于图床系统的解决方案。
图床方案迭代#
其实在博客搭建之初因为内容并不多,也比较少有插图,所以大部分的图片都是直接放在我的 Hugo 博客仓库的 static 目录下,也没觉得有什么不便,直到有一段时间需要多平台发布,复制了博客的 markdown 源文件后,因为所有图片都是博客的相对路径,导致图片全部无法显示,需要把图片一张张重新上传,十分繁琐。
那时才开始了解到图床(Image hosting)这个概念,把图片上传到一个专用的存储服务并通过公开链接使用,不但可以统一进行管理,还能有效减少博客仓库文件的体积,提高网站的加载速度。
GitHub + jsDelivr CDN + PicGo#
一开始我是新建了一个 GitHub 仓库「GitHub - image-hosting」,通过 PicGo 直接上传到仓库,并在 PicGo 返回时的图片路径改为 jsDelivr CDN 加速后的链接,其实倒也还算方便,还多了一份版本管理。
不过好景不长, jsDelivr 遭到了 DNS 污染,被大陆封锁,以至于我的博客图片在很长一段时间完全无法加载,也让我对这种纯依赖 CDN 的方式有了一些顾虑,再加上 GitHub 托管图片是基于代码仓库,上传图片依赖的是代码提交,容易污染 commit 记录,且终究算是一种滥用,万一账号 / 仓库访问有问题也容易丢失所有图片,于是开始寻找其他方案。
阿里云 OSS + PicGo#
第二个想到的就是云服务商提供的对象存储了,像是 Amazon S3、阿里云 OSS 等都是云厂商提供的对象存储服务,在提供可访问的公开链接的基础上还多了权限控制、数据备份、拓展性等优势,在相对低成本的前提下提供了针对文件数据存储和管理的较优解决方案。
由于是想针对中国大陆用户进行访问优化,最终我选择了阿里云 OSS,配置不算复杂,同样是通过 PicGo 进行上传并转换为阿里云 OSS 的链接,在访问速度上有了明显的提升。

不过由于多是按量计费,持续增长的成本对于非盈利的个人博客来说也是需要考虑的。23 年初有一阵子博客流量较大,月账单持续上涨,再加上阿里云 OSS 如果需要自定义访问域名则需要进行备案,我域名本身通过 Cloudflare 进行托管,并不考虑备案,所以在用了几个月后,还是考虑更换图床方案。
Chevereto + PicGo#
经过了一番调研,在我线路不错的搬瓦工服务器(CN2GIA DC6 机房)上使用 Docker 镜像部署了 Chevereto 的免费自部署版本,并将图片以 Docker Volume 的形式挂载在主机上。
Chevereto 的界面实话说风格有些老旧,还是古早的 php 服务,免费版也很久就不再维护升级,但胜在功能完备,同样可以使用 PicGo 对接 Chevereto 的 API 进行图片上传等操作,稳定性也不错,于是就这样用了一年半。
但自己对于自部署服务的稳定性和数据的珍贵性还是有些大意,前几天服务器突然挂了,内核报错直接无法重启,服务挂了倒还好说,但是我这一年半多的图片数据也无法导出,工单联系技术支持,一天只回复了我两次,一次让我重启,一次建议我聘请一个网络管理员排查。
只能自力更生,翻遍了网上各种方案,折腾了一天终于算是解决了,但这一次的教训让我对有重要数据的服务备份和自部署稳定程度都有了全新的认识,再加上想要重新部署的时候发现免费版镜像等已经下线,只剩一个按年付费的 License 版本,于是放弃了原方案。
Cloudflare R2 + WebP Cloud + PicGo#

于是重新转向了云服务厂商的对象存储,发现了赛博菩萨 Cloudflare 提供的 R2 对象存储这一服务,免费计划中有每月 10 GB 的存储容量,对于个人使用来说完全够用,大厂的服务与数据安全也有保障。
为了优化用户的访问,又使用了一个「WebP Cloud」服务对 R2 的图片进行代理,在代理层面进一步减小图片体积,虽然对于国内用户来说速度肯定还是比不上阿里云 OSS 这种线路,但是在不用备案、稳定且免费的综合条件下,这是我能想到的最好的方案了。
在电脑端同样是通过 PicGo 客户端几乎一键上传并生成博客直接可用的 markdown 图片链接,配置完成后使用起来很顺滑。
图床搭建说明#
Cloudflare R2 + WebP + PicGo 的方案尽管牵扯到了多个组件和平台,但所有操作都在 Free Plan 中,也是我最终选定的方案,下面将从零开始介绍如何搭建这个免费图床系统。
Cloudflare R2#
R2 是 Cloudflare 推出的免费对象存储服务,需要免费注册一个 Cloudflare 账号才能使用,注册登录后,点击左侧边栏的 R2 访问服务,但需要注意的是开通 R2 服务需要绑定信用卡(国内外主流信用卡皆可),但并不会扣费,主要是为了验证用户身份使用。
创建图床 Bucket#

开通 R2 服务后,点击右上角「创建存储桶」按钮进行创建。

进入创建配置界面后,需要填写存储桶(Bucket)名称,建议有一些辨识度,后续在配置上传时会用到。
位置则选择「自动」,但可以额外多配置一个位置提示,由于我后续还将使用「WebP Cloud」服务的美西机房进行图片代理优化,所以在此处选择的是「北美洲西部(WNAM)」,根据需求选其他区域也可以,但 Cloudflare 并不保证一定会分配到所指定的区域。

点击「创建存储桶」按钮即完成创建,此时我们已经可以向我们的「yu-r2-test」存储桶上传文件了,可以选择在网页直接上传文件或文件夹。
也可以使用 S3 API 进行上传,我们后续使用 PicGo 客户端进行上传就依赖这种方式,但需要进行一些额外配置,点击导航栏「设置」选项进行配置。

首先我们需要打开「R2.dev 子域」,这是为了后续访问图片时需要的公网地址,点击「允许访问」,并按照提示输入「allow」即可开启。

完成后会显示一个以 r2.dev 结尾的公网网址,即我们后续访问图片的网址。
自定义图床域名(可选)#
但是分配的网址比较长,不易于记忆,我们可以通过「自定义域」来绑定我们的专属域名,点击「连接域」按钮。

输入自己想绑定的域名,如 yu-r2-test.pseudoyu.com,点击继续。


连接域,并等待 DNS 解析生效即可。

完成后 bucket 状态处「公共 URL 访问」显示 “已允许”,且「域」显示为我们刚自定义的域名即配置成功。
配置 Bucket 访问 API#

当我们完成上述配置后,可以回到存储桶「对象」界面,上传一张示例图片,点开详情则会显示该图片的访问地址,此时我们就拥有了一个可访问的图床服务了。
但每次都要打开 Cloudflare 页面手动上传图片的方式显然不够便捷。R2 提供了 S3 兼容的 API,可以方便地使用一些客户端 / 命令行工具进行上传、删除等操作。


回到 R2 主页面,点击右上角「管理 R2 API 令牌」,进入后点击「创建 API 令牌」。

输入令牌名称,「权限」选择 “对象读和写” 并将此 API 指定之前所创建的 Bucket,这样最小化权限也保障数据安全,其余选项保持默认即可。

完成创建后会显示所有密钥,我们使用 PicGo 需要的是下面三个信息,不过因为只会显示一次,建议在密码管理软件或其他地方妥善保管好这些参数信息。
至此,我们需要在 Cloudflare R2 上配置的部分就完成了,接下来我们需要配置 PicGo 客户端。
PicGo#
PicGo 是一个用于快速上传并获取图片 URL 的工具软件,有着较为丰富的插件生态,支持多种图床服务,其 GitHub 仓库为「GitHub - Molunerfinn/PicGo」,可以下载对应平台客户端使用。
配置 R2 图床#
PicGo 本体并不包括 S3 图床,但可以通过「GitHub - wayjam/picgo-plugin-s3」插件来支持。

在「插件设置」中选择安装,「图床设置」中就新增了 Amazon S3 选项。点击进入配置选项。

这里有几项配置需要尤其注意。
- 应用密钥 ID,填写 R2 API 中的 Access Key ID(访问密钥 ID)
- 应用密钥,填写 R2 API 中的 Secret Access Key(机密访问密钥)
- 桶名,填写 R2 中创建的 Bucket 名称,如我上文的
yu-r2-test - 文件路径,上传到 R2 中的文件路径,我选择使用
{fileName}.{extName}来保留原文件的文件名和扩展名。 - 自定义节点,填写 R2 API 中的「为 S3 客户端使用管辖权地特定的终结点」,即
xxx.r2.cloudflarestorage.com格式的 S3 Endpoint - 自定义域名,填写上文生成的
xxx.r2.dev格式的域名或自定义域名,如我配置的 `yu-r2-test.pseudoyu.com
其他配置保持默认即可,确认参数无误后点击「确定」与「设置为默认图床」即可。
图片上传#

完成上述配置后,我们就可以在「上传区」直接拖入文件进行图片上传了,如上传后显示无误则为配置成功,生成的链接会自动在系统剪贴板中,直接在需要的地方粘贴即可。

并且可以在链接格式处选择对应格式,如 URL 或是博客可用的 Markdown 格式链接等。这里我还做了一个小的配置,在左侧「PicGo 设置」 - 「自定义链接格式」中修改为 ,并在上传区的链接格式处选择了「Custom」,这样我上传后就会根据文件名生成以文件名为 Alt 文本的 Markdown 图片链接。
WebP Cloud 图片优化#
至此我们已经完成了整个图床的搭建、配置和上传,但通常我们本地截图或是相机拍摄的图片体积较大,对于访客来说加载时间会较长,并不直接适合互联网发布。
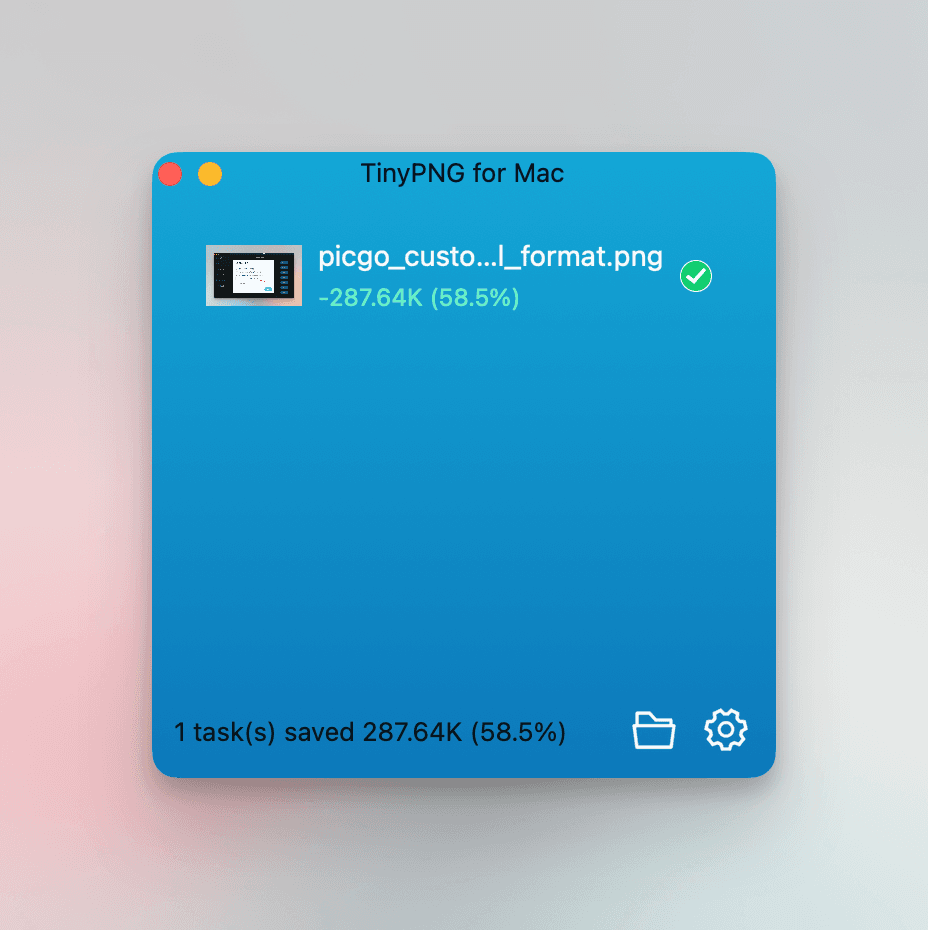
我在很长的一段时间都用了非常笨的方法,即「TinyPNG」这一在线网站的 api 配合一个开源的 macOS 客户端应用,将图片拖入其中进行压缩后再通过 PicGo 上传到图床,通常能够在图片质量损失较小的前提下减少图片 50% 以上的体积,繁琐却有效。
这次更换图床方案后也开始寻找更智能的图片优化服务,想到了「WebP Cloud」。
其实了解到这一服务是去年的一个晚上和 STRRL 正在杭州一个商城的电玩城里看人打音游,他给我看了 Nova Kwok 的一篇博客上了 hacker news 榜首的消息,一起围观了半天,不过当时大概只知道是优化图片的服务,并没有详细了解。
于是又去打开了官网「webp.se」看了一下更为详细的介绍。

简单来说这是一个类 CDN 的图片代理 SaaS 服务,可以在几乎不改变画质的情况下大幅缩小图片体积,加快整体站点加载速度。发展到现在除了图片体积减少外,还提供了缓存、添加水印、图片滤镜等更多实用的功能,并提供了自定义 Header 等配置选项。
看了一圈,觉得能很好满足我的博客图片优化需求,开始折腾配置。
配置 WebP Cloud#

首先通过 GitHub 授权登录 WebP Cloud 平台。

页面非常直观,主要显示了当前 Plan 下的 Free Quota 和额外 Quota 的数据,以及一些用量统计。
点击「Create Proxy」按钮可以添加配置。

- 为了优化国内访问,我「Proxy Region」选择的是美西「Hillsboro, OR」区域
- 「Proxy Name」填写一个自定义名称即可
- 「Proxy Origin URL」,比较重要,需要填写上文我们配置好的 R2 自定义域名,如我填写的是
yu-r2-test.pseudoyu.com,如果没配置自定义域名则填写 R2 提供的xxx.r2.dev格式的域名

图中 Basic info 部分「Visitor」下显示的以 xxx.webp.li 格式即为我们的代理地址。
例如我们之前通过 PicGo 上传到 R2 的文件 yu-r2-test.pseudoyu.com/new_mbp_setup.jpg 则可以用 dc84642.webp.li/new_mbp_setup.jpg 这一链接进行访问。
如果不喜欢默认的代理地址,则可以右下角 Chat 或是邮箱联系开发者进行自定义域名修改,之后或许也会有更自动化的配置流程。
下面可以通过滑动条来调整图片压缩比率,默认为 80%,5M 的 jpg 图片压缩后的 webp 大小通常小于 1M,基本满足了网络传播需求,其他配置保持默认即可,如有需要可以根据文档进行配置。
更改 PicGo 配置#

需要注意的是,由于我们最终需要放在博客中的图片是经过 WebP Cloud 代理过的链接,所以需要回到 PicGo 的「图床设置」中,将「自定义域名」改为我们刚配置的 WebP Cloud 代理地址,即格式为 xxx.webp.li 的代理链接或其他自定义域名。
WebP Cloud 用量#
免费用户每天有 2000 Free Quota,即能够代理 2000 次图片访问请求,并提供 100M 的图片缓存,对于一般用户来说完全够用,如有一些流量较大的特定时期也可以购买额外 Quota,价格很便宜。
如超过了 Quota,访问则会被 301 转发到源站图片地址,不经 WebP Cloud 服务压缩,但依然可用;超过 100M 的缓存则会按照 LRU 算法清理,所以依然能够保障一些高频请求的图片能够有较好的访问体验。

我博客的日访问量大概在 300-500 visits 左右,再加上一些 RSS 订阅和爬虫的流量,根据 WebP Cloud 统计测算来看,平日的请求大概在 4000-5000 次,发博文当天会有 10000+。

所以目前先选择了 Lite 计划,配合一些额外用量来 Cover 高峰流量,打算再观察一阵子看看。
总结#
以上就是我的图床系统搭建方案,本文的所有图片也都使用 PicGo 上传、Cloudflare R2 存储并经 WebP Cloud 代理优化。
这是我的博客搭建部署系列教程之一,如对评论系统、数据统计系统等搭建感兴趣,请持续关注,希望能对大家有所参考。